- Sitemap Editor Overview
NEST Sitemap Editor functions similarly to sitemaps found on other software. Unlike other software, on NEST application pages are named Forms and they can be easily dragged from the Palette and placed on the sitemap to create more application pages. Sitemap Editor consists of the editing field on the left and the Palette on the right. Previous to developing your mobile application it is a good idea to visualize how many pages your applications will need and how they will connect with each other.
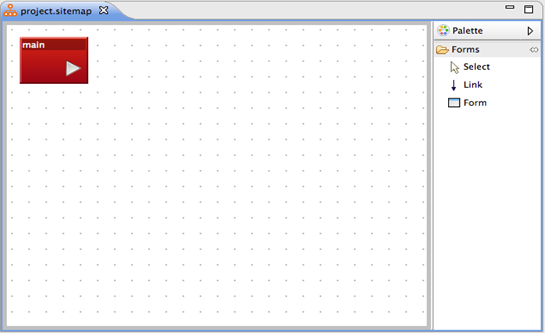 Figure 5 Sitemap Editor
- Sitemap Editor Features
- You can add Forms to the Sitemap. These Forms will be pages in your smart application. Then, add Links to set relationships between the Forms. For example, connecting Form 1 and Form 2 will allow you to go from Form 1 to Form 2 on your application. Click the Link component from the palette to the right of the sitemap editor and then click on the first Form you want to connect and then click another Form to connect the first chosen Form to the second chosen Form.
- Sitemap Editor also allows you to keep track of your Forms and how they are linked. You can click and drag “Form” from the palette to the Sitemap area to add the Forms. Also, you may copy and paste the Forms to duplicate them. Double clicking on the Forms will open up its page, where you can edit according to your plans.
* More,
You cannot design your page on the Sitemap Editor. To design each page of your application, double-click the Form, and the page will open under Visual Editor, where you can create each page and add different components. - How to Create a new Form
When a new project is created a Home Form will already exist, it is typically the first page of the application. Home Forms although are used typically as the first page of the application they can be set so that they are not by selecting a different Form to start on by clicking on the Form and in the Properties window to the right of the sitemap editor changing the Start No to Yes. Any Form can be changed to any other kinds of Forms through the use of the Properties menu as it was mentioned in the previous sentence.
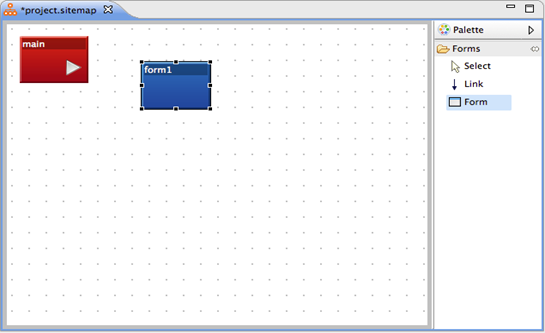 Figure 6 Creating a New Form
- Additional Forms can be simply added by selecting the Form icon from the Palette on the right and dragging it to the Sitemap Editor as many times as it is needed. Newly added forms can be viewed by double clicking on the newly created form icons on the Sitemap Editor or by clicking on the new Form tabs on the Project Explorer located on the left of the Sitemap Editor.
- Home forms can be differentiated from other Form icons on the Sitemap Editor by the red color instead of blue and the presence of the triangular arrow.
Please refer to the following to learn about different types of Forms NEST offers.
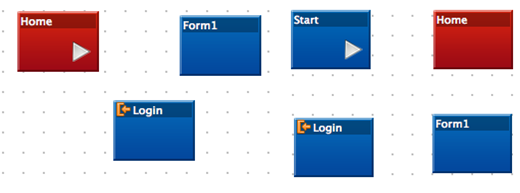 Figure 7 Different Types of Forms
Types of Forms
Type: Home
Display: Red background
Purpose: This is the home page of your smart application. This is normally used as the main page of the application so when developing the application it is easier to tell apart which Form is the main Form at a quick glance. There can only be one Home Form.

Type: Start
Display: White triangular arrow
Purpose: This is the start page of your smart application, which means this is the first page you will see when you open your application on your device. There can only be one Start Form.

Type: Home and Start
Display: Red background with white triangular arrow
Purpose: In most cases, the main page is also your start page. By setting the Form as Home and Start, the main page will be first page when the app is opened on your device.
Note that multiple features, like Home and Start, can be set to one Form.

Type: Basic Form
Display: Blue background
Purpose: The most common type of Form. This type of Form is used as other pages except for Home, Start, and Login page.

Type: Login
Display: Orange icon located on the left top corner
Purpose: If a page on your application requires a sign in or a log in feature, set the Form as a Login Form.

Type: Layer
Display: Grey background
Purpose: If you need to show two pages at once such as when a menu page appears that takes up a considerable amount of space and another Form remains visible.

Type: Logic
Design: Green background
Purpose: Holds events that are used on multiple pages such as when accessing menu or options page is available on each Form. There is no user interface for this Form, it is just an event holder.
- How to Set Form Properties
 Figure 8 Form Properties View
- In order to set properties to your Form, you can make changes under Properties located on the right side of IDE. Double click the Form you wish to make changes to and the Properties menu for that Form will appear. Click on the option you would like your change to and select Yes or No form the drop down menu that appears.
- The following table will guide you in making changes to Form properties.
[id] Set a name for your form to identify. You may not use duplicate id for multiple forms.
[id] must begin with a letter and you can use only letters and numbers.Home Option to set your Form as a Home Form
Choose Yes or NoStart Option to set your Form as a Start Form
Choose Yes or No.Login Option to set your Form as a Login Form
Choose Yes or No.Layer Option to set your Form as a Layer Form
Choose Yes or NoLogic Option to set your Form as a Logic Form
Choose Yes or No
- How to set relationships between Forms
Most applications consist of multiple pages and pages are set to be connected to each other through the use of Links. Page connections or in terms of NEST, Form connections can be done in Sitemap Editor with the Link component as shown below.
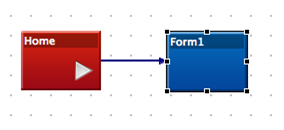 Figure 9 Setting a relationship between two Forms (Simple, one-way relationship)
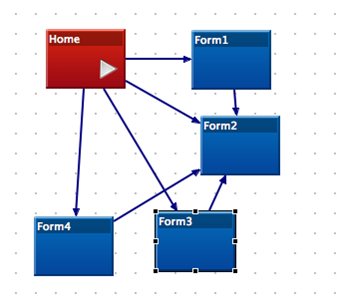 Figure 10 Setting relationships among many Forms (Complex relationship)
As seen in Figure 9 and Figure 10, you can set relationships between multiple Forms. This will set the order of pages displayed on your app, which users can view visually on the Sitemap Editor. Also, you can always make adjustments to the relationship order anytime.